Life@uki2

Empowering the younger Generation

Empowering the younger Generation


Wednesday, April 24, 2019

Monday, March 25, 2019

March 25, 2019

OpenStreetMap என்றால் என்ன?

OpenStreetMap என்றால் என்ன?

அனைவருக்கும் வணக்கம்.......! 
நாம் இன்று OpenStreetMap என்றால் என்ன? என்பது பற்றி பாக்க போகின்றோம்.

முதலில் Map என்றவுடனே நம்கண்முன்னே வருவதெல்லாம் Google Mapதான் ஏன்என்றால்  Android O/S இல்   Google Map வருவதனால் நாம் அனைவரும் அதற்க்கு பரிட்சையமாகிவிட்டோம்.
சரி நாம் முதலில் சில Maps வகைகளை பார்ப்போம் 
1. Google Map
2. Apple Map
3. Wiki Map
4. Bing Map
5. OSM map - OpenSreetMap 

 பிற Maps களில் என்ன பிரச்சனை உள்ளது  என்பதை பற்றி பார்ப்போம் 
1.API Restrictions
2.Licensing & Rights based Restrictions
3.Intentional errors / lies
4.Vendor Lock-In
5.Hierarchies / Access Levels
6.Limited Tags/ Features

அடுத்ததாக இங்கு நாம் ஏன் OSM ஐ தெரிவுசெய்தோம் என்பதை பற்றி பார்ப்போம் 
1.Open Data,No limitation on data usage
2.No Lock-In
3.No Easter Eggs
4.No Hierarchies
5.Tags / Features -Community Proposals

  • OpenStreetMap என்றால் என்ன?

OpenStreetMap  என்பது உலகின் ஒரு சிறந்த திறந்த மூல வரைபடம் ஆகும். இது உலகம் முழுவதும் உள்ளவர்கள் (தன்னார்வலர்களால்) உருவாக்கிய வரைபடம். எல்லோராலும் சுவாரஸ்யமான அல்லது முக்கியமான விஷயங்களைக் கண்டறிய முடியும். அது ஏதோவொன்றாக இருக்கலாம் - காடுகளிலிருந்து சாலைகள் மற்றும் அருங்காட்சியகங்கள் வழியாக கடைகள் வரை. மக்கள் வரைபட கட்டிடங்கள், நடைபாதை வழிகள், சுற்றுலா இடங்கள், பாறைகள் மற்றும் நீரோட்டங்கள் என்பன...

இனி நாம் எவ்வாறு OSM க்கு பங்களிக்க முடியும் என்பதை பார்ப்போம்
1.create Account- (https://www.openstreetmap.org)என்ற இணையதள முகவரிக்கு செல்க 2.Arm-chair Mapping -இருந்த இடத்தில் இருந்து வரைவது 3.Field Survey -தளத்துக்கு சென்று வரைவது 4.Hibrid -மேலே சொன்ன இரண்டும் இதிலடங்கும்

இந்த பிரிவில் OpenStreetMap வலைத்தளத்தை எவ்வாறு வழிநடத்தலாம் மற்றும் பயனர் கணக்கிற்காக பதிவு செய்யவது எப்படி என்பதை படிப்படியாக கற்ப்போம், உங்களுடைய சொந்த பயனாளர் பெயர் மற்றும் கடவுச்சொல் ஆகியவற்றைப் பெற்ற பிறகு, வரைபடத்தில் உங்கள் முதல் புள்ளிகளைப் பங்களிக்க முடியும்.
https://www.openstreetmap.org/#map=19/7.37164/81.79639&layers=N

  • ரைபடத்தை எப்படி தொடங்குவது?

  1.   ஒரு OPENSTREETMAP கணக்கை உருவாக்கவும்

  • உங்கள் இணைய உலாவியைத்(web browser) திறந்து  சாளரத்தின்மேல் உள்ள முகவரிப் பட்டியில்(address bar), www.openstreetmap.org  உள்ளிட்டு, Enter ஐ அழுத்தவும்
  • OpenStreetMap வலைத்தளத்தில், பக்கத்தின் மேல் வலது மூலையில் "பதிவு பெறுக " (Sign up) என்பதைக் கிளிக் செய்க.
  • இதைப் போன்ற ஒரு புதிய பக்கத்தை நீங்கள் பெற்றிருப்பீர்கள்

  • முதல் இரண்டு பெட்டிகளில் உங்கள் மின்னஞ்சல் முகவரியை உள்ளிடவும். நீங்கள் இரு பெட்டிகளிலும் அதே மன்னஞ்சல் முகவரியை உள்ளிட வேண்டும். பின்னர், OpenStreetMap உடன் உங்கள் கணக்கை உறுதிப்படுத்த உங்கள் மின்னஞ்சலை திறக்க வேண்டும்.
  • மூன்றாவது பெட்டியில், நீங்கள் விரும்பும் பயனர் பெயரை உள்ளிடவும்.
  • நான்காவது மற்றும் ஐந்தாவது பெட்டிகளில் ஒரு புதிய கடவுச்சொல்லை உள்ளிடவும். இரண்டு பெட்டிகளிலும் அதே கடவுச்சொல்லை உள்ளிட வேண்டும்
  • நீங்கள் அனைத்து பெட்டிகளையும் நிறைவு செய்த பிறகு, பக்கத்தின் கீழே உள்ள "பதிவு" என்பதைக் கிளிக் செய்க.


  • OpenStreetMap பக்கத்தில், மேல் வலது மூலையில் "உள்நுழை" என்பதைக் கிளிக் செய்க.
  • உங்கள் OpenStreetMap பயனர்பெயர் மற்றும் கடவுச்சொல்லை உள்ளிட்டு Enter ஐ அழுத்தவும்.
  • நீங்கள் இப்போது உள்நுழைந்திருக்க வேண்டும் பக்கத்தின் மேல் வலது மூலையில் உங்கள் பயனர்பெயரை நீங்கள் காண முடியும்.


OSM எவ்வாறு கட்டமைக்கப்படுகிறது என்பதைப் பார்ப்போம். OSM தரவு மாதிரியில் மூன்று அடிப்படை கூறுகள் உள்ளன இவை nodes , ways மற்றும் relations ஆகியவை அனைத்தும் ஒரு ஐடி மூலம் வந்தவை வந்தவையாகும்   
http://overpass-turbo.eu/


 நீங்கள் இதை இதுவரை செய்திருந்தால், வாழ்த்துக்கள்!  OpenStreetMap உடன் வரைபடங்களை எப்படி உருவாக்குவது என்பது பற்றிய நல்ல புரிதலை பெற்றிருப்பீர்கள்.


OpenStreetMap, மற்றும் OSM பற்றி மேலும் அறிய உதவும் ஆவணங்கள் மற்றும் பயிற்சிகள் தொடர்பான பிற திட்டங்களைப் பற்றி இங்கே காணலாம்.

http://www.kaniyam.com/video-on-openstreetmaps-org-in-tamil/
https://mapsaregreat.com/What-is-OpenStreetMap.html
https://wiki.openstreetmap.org/wiki/Using_OpenStreetMap


அடுத்த பதிவில் சந்திக்கின்றேன்….
             நன்றி
         வணக்கம்


Thursday, March 1, 2018

March 01, 2018

React.js

React.js


 1.What is React.js?

  • Developed by Facebook
  • React is a view layer library, not a framework like Backbone, Angular etc.
  • You can't use React to build a fully-functional web app

2.Why was React developed?

  • Complexity of two-way data binding
  • Bad UX from using "cascading updates" of DOM tree
  • A lot of data on a page changing over time
  • Complexity of Facebook's UI architecture
  • Shift from MVC mentality

3.Who uses React?


Why should I use React?

  • Easy to read and understand views
  • Concept of components is the future of web development
  • If your page uses a lot of fast updating data or real time data - React is the way to go
  • Once you and your team is over the React's learning curve, developing your app will become a lot faster


React.js is a JavaScript library. It was developed by engineers at Facebook.
                              

 why people choose to program with React:
        1. React is fast. Apps made in React can handle complex updates    and still feel quick and responsive. 
        2. React is modular. Instead of writing large, dense files of code, you can write many smaller, reusable files. React's modularity can be a beautiful solution to JavaScript's.
        3. React is flexible. You can use React for interesting projects that have nothing to do with making a web app. People are still figuring out React's potential.
       4.React is popular. While this reason has admittedly little to do with React's quality, the truth is that understanding React will make you more employable.  
 
                    --how to work React-- 
                        
                         React worked in browser


 You go and easy to study react.js here:https://reactjs.org/

                    I WILL MEET YOU IN NEXT MY BLOG....... 


Monday, February 26, 2018

February 26, 2018

ER Diagram

ER Diagram 

What is an ER diagram?

The ER model defines the conceptual view of a database. It works around real-world entities and the associations among them. At view level, the ER model is considered a good option for designing databases.

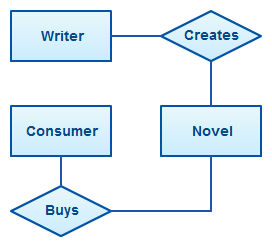
An Entity Relationship Diagram (ERD) is a visual representation of different entities within a system and how they relate to each other. For example, the elements writer, novel, and a consumer may be described using ER diagrams the following way


ER Diagram Symbols and Notations


ER Diagrams Usage

What are the uses of ER diagrams? Where are they used? Although they can be used to model almost any system they are primarily used in the following areas.

ER Models in Database Design

They are widely used to design relational databases. The entities in the ER schema become tables, attributes and converted the database schema. Since they can be used to visualize database tables and their relationships it’s commonly used for database troubleshooting as well.


ER diagrams in software engineering 

Entity relationship diagrams are used in software engineering during the planning stages of the software project. They help to identify different system elements and their relationships with each other. It is often used as the basis for data flow diagrams or DFD’s as they are commonly known. 

For example, an inventory software used in a retail shop will have a database that monitors elements such as purchases, item, item type, item source and item price. Rendering this information through an ER diagram would be something like this:


Entity

Entities are represented by means of rectangles. Rectangles are named with the entity set they represent.

Weak Entity

A weak entity is an entity that depends on the existence of another entity. In more technical terms it can be defined as an entity that cannot be identified by its own attributes. It uses a foreign key combined with its attributed to form the primary key. An entity like order item is a good example for this. The order item will be meaningless without an order so it depends on the existence of the order.

Attribute

Attributes are the properties of entities. Attributes are represented by means of ellipses. Every ellipse represents one attribute and is directly connected to its entity (rectangle).


Derived Attribute

An attribute based on another attribute. This is found rarely in ER diagrams. For example, for a circle, the area can be derived from the radius.


composite Attribute

If the attributes are composite, they are further divided in a tree like structure. Every node is then connected to its attribute. That is, composite attributes are represented by ellipses that are connected with an ellipse.


Multivalued Attribute

If an attribute can have more than one value it is called a multi valued attribute. It is important to note that this is different to an attribute having its own attributes. For example, a teacher entity can have multiple subject values.

Relationship

Relationships are represented by diamond-shaped box. Name of the relationship is written inside the diamond-box. All the entities (rectangles) participating in a relationship, are connected to it by a line.

Recursive Relationship

If the same entity participates more than once in a relationship it is known as a recursive relationship. In the below example an employee can be a supervisor and be supervised, so there is a recursive relationship

Cardinality and Ordinality

These two further defines relationships between entities by placing the relationship in the context of numbers.


Relationship

Relationships are represented by diamond-shaped box. Name of the relationship is written inside the diamond-box. All the entities (rectangles) participating in a relationship, are connected to it by a line.

Binary Relationship and Cardinality

A relationship where two entities are participating is called a binary relationship. Cardinality is the number of instance of an entity from a relation that can be associated with the relation.
  • One-to-one − When only one instance of an entity is associated with the relationship, it is marked as '1:1'. The following image reflects that only one instance of each entity should be associated with the relationship. It depicts one-to-one relationship.
  • One-to-one
  • One-to-many − When more than one instance of an entity is associated with a relationship, it is marked as '1:N'. The following image reflects that only one instance of entity on the left and more than one instance of an entity on the right can be associated with the relationship. It depicts one-to-many relationship.
  • One-to-many
  • Many-to-one − When more than one instance of entity is associated with the relationship, it is marked as 'N:1'. The following image reflects that more than one instance of an entity on the left and only one instance of an entity on the right can be associated with the relationship. It depicts many-to-one relationship.
  • Many-to-one
  • Many-to-many − The following image reflects that more than one instance of an entity on the left and more than one instance of an entity on the right can be associated with the relationship. It depicts many-to-many relationship.
  • Many-to-many

Participation Constraints

Total Participation − Each entity is involved in the relationship. Total participation is represented by double lines. 
  • Partial participation − Not all entities are involved in the relationship. Partial participation is represented by single lines.

Participation Constraints

Wednesday, February 21, 2018

February 21, 2018

Mongoose


What is Mongoose?
 

Mongoose is an object modeling package for Node that
essentially works like an ORM (Object-relational
mapping ) that you would see in other languages.

Mongoose allows us to have access to the MongoDB
commands for CRUD simply and easily.

Mongoose Installation

npm install mongoose --save

Now that we have the package, we just
have to grab it in our project

var mongoose = require('mongoose');

We also have to connect to a MongoDB
database (either local or hosted)

mongoose.connect('mongodb://localhost/
myappdatabase');

Terminology of Mongoose

Mongoose will use the terms Schema
and Model.

What is Schema?
"Mongoose Schema will create a mongodb collection
and defines the shape of the documents within that
collection".
If we want to create a mongodb collection in a structured
manner similar to SQL tables then we can do that using
mongoose Schema.
In the schema creation we will specify the details of fields
like field name, its type, default value if need, index
concept if need, constraint concept if need.


What is Model?
Schemas define a structure we will apply that
Schema part to a model, means "Models are the
constructors compiled from our schema
definitions".

Instances of these models represent documents
which can be saved and retrieved from our
database. All document creation and retrieval
from the database is handled by these models.

 Key Methods and Properties of
Mongoose

Connect() :- Opens the default mongoose
connection.

CreateConnection() :-Will creates a connection
instance and its work is similar to connect()
Schema():-The Mongoose Schema constructor
Model():-The Mongoose Model constructor
Document() :-The Mongoose Document constructor.
Disconnect():- Disconnects all connections

Mongoose Connection

Open(): Opens the connection to MongoDB.
OpenSet():Opens the connection to a replica
set.
close() :Closes the connection, it doesn’t throw
any error even the connection is not opened or
already closed.

February 21, 2018

AJAX

jQuery - AJAX Introduction


AJAX is the art of exchanging data with a server, and updating parts of a web page - without reloading the whole page


What is AJAX?

AJAX = Asynchronous JavaScript And XML.

In short; AJAX is about loading data in the background and display it on the webpage, without reloading the whole page.

Examples of applications using AJAX: 
Gmail, Google Maps, Youtube, and Facebook tabs.


What About jQuery and AJAX?

jQuery provides several methods for AJAX functionality.

With the jQuery AJAX methods, you can request text, HTML, XML, or JSON from a remote server using both HTTP Get and HTTP Post - And you can load the external data directly into the selected HTML elements of your web page!


jQuery - AJAX load() Method

jQuery load() Method

The jQuery load() method is a simple, but powerful AJAX method.

The load() method loads data from a server and puts the returned data into the selected element.

Syntax:

$(selector).load(URL,data,callback);

The required URL parameter specifies the URL you wish to load.


The optional data parameter specifies a set of querystring key/value pairs to send along with the request.


The optional callback parameter is the name of a function to be executed after the load() method is completed.


The optional callback parameter specifies a callback function to run when the load() method is completed. The callback function can have different parameters:


responseTxt - contains the resulting content if the call succeeds

statusTxt - contains the status of the call

xhr - contains the XMLHttpRequest object

The following example displays an alert box after the load() method completes. If the load() method has succeeded, it displays "External content loaded successfully!", and if it fails it displays an error message:

Example\

$("button").click(function(){
    $("#div1").load("demo_test.txt", function(responseTxt, statusTxt, xhr){
        if(statusTxt == "success")
            alert("External content loaded successfully!");
        if(statusTxt == "error")
            alert("Error: " + xhr.status + ": " + xhr.statusText);
    });
});


jQuery - AJAX get() and post() Methods

The jQuery get() and post() methods are used to request data from the server with an HTTP GET or POST request.

HTTP Request: GET vs. POST

Two commonly used methods for a request-response between a client and server are: GET and POST.

GET - Requests data from a specified resource
POST - Submits data to be processed to a specified resource

GET is basically used for just getting (retrieving) some data from the server. Note: The GET method may return cached data.

POST can also be used to get some data from the server. However, the POST method NEVER caches data, and is often used to send data along with the request.

To learn more about GET and POST, and the differences between the two methods, please read our HTTP Methods GET vs POST chapter.

jQuery $.get() Method

The $.get() method requests data from the server with an HTTP GET request.

Syntax:

$.get(URL,callback);

The required URL parameter specifies the URL you wish to request.

The optional callback parameter is the name of a function to be executed if the request succeeds.

The following example uses the $.get() method to retrieve data from a file on the server:

Example

$("button").click(function(){
    $.get("demo_test.asp", function(data, status){
        alert("Data: " + data + "\nStatus: " + status);
    });
});


The first parameter of $.get() is the URL we wish to request ("demo_test.asp").

The second parameter is a callback function. The first callback parameter holds the content of the page requested, and the second callback parameter holds the status of the request.


jQuery $.post() Method

The $.post() method requests data from the server using an HTTP POST request.

Syntax:

$.post(URL,data,callback);

The required URL parameter specifies the URL you wish to request.

The optional data parameter specifies some data to send along with the request.

The optional callback parameter is the name of a function to be executed if the request succeeds.

The following example uses the $.post() method to send some data along with the request:

Example

$("button").click(function(){
    $.post("demo_test_post.asp",
    {
        name: "Donald Duck",
        city: "Duckburg"
    },
    function(data, status){
        alert("Data: " + data + "\nStatus: " + status);
    });
});


The first parameter of $.post() is the URL we wish to request ("demo_test_post.asp").

Then we pass in some data to send along with the request (name and city).

The ASP script in "demo_test_post.asp" reads the parameters, processes them, and returns a result.

The third parameter is a callback function. The first callback parameter holds the content of the page requested, and the second callback parameter holds the status of the request.


More learn:- https://www.w3schools.com/

                                        
Thank you!

Tuesday, February 20, 2018

February 20, 2018

Express


Express

ExpressJS is a web application framework that provides you with a simple API to build
websites, web apps and back ends. With ExpressJS, you need not worry about low level
protocols, processes, etc.


1.What is Express?

Express provides a minimal interface to build our applications. It provides us the tools that
are required to build our app. It is flexible as there are numerous modules available
on npm, which can be directly plugged into Express.
Express was developed by TJ Holowaychuk and is maintained by the Node.js foundation
and numerous open source contributors.
Why Express?
Unlike its competitors like Rails and Django, which have an opinionated way of building
applications, Express has no "best way" to do something. It is very flexible and pluggable.
Pug
Pug (earlier known as Jade) is a terse language for writing HTML templates. It -
  • Produces HTML
  • Supports dynamic code
  • Supports reusability (DRY)
It is one of the most popular template language used with Express.


MongoDB and Mongoose
 
MongoDB is an open-source, document database designed for ease of development and
scaling. This database is also used to store data.
Mongoose is a client API for node.js which makes it easy to access our database from our
Express application.

Express install

    node --version

    npm --version

    npm install -g <package-name>

➞Step 1: Start your terminal/cmd, create a new folder named hello-world and cd (create
directory) into it:

➟step 2
npm init

➞step 3
npm install --save express

ls node_modules #(dir node_modules for windows)

npm install -g nodemon

This is all we need to start development using the Express framework. To make our
development process a lot easier, we will install a tool from npm, nodemon. This tool
restarts our server as soon as we make a change in any of our files, otherwise we need to
restart the server manually after each file modification.

We have set up the development, now it is time to start developing our first app using
Express. Create a new file called index.js and type the following in it.

var express = require('express');
var app = express();
app.get('/', function(req, res){
res.send("Hello world!");
});
app.listen(3000);

Save the file, go to your terminal and type the following.

nodemon index.js

This will start the server. To test this app,

ExpressJS – Routing

app.method(path, handler)

This METHOD can be applied to any one of the HTTP verbs – get, set, put, delete. An
alternate method also exists, which executes independent of the request type.
Path is the route at which the request will run.

ExpressJS – HTTP Methods

➞GET ⇒The GET method requests a representation of the specified resource. Requests
using GET should only retrieve data and should have no other effect.

➞POST ⇒The POST method requests that the server accept the data enclosed in the
request as a new object/entity of the resource identified by

➞PUT ⇒The PUT method requests that the server accept the data enclosed in the
request as a modification to existing object identified by the URI. If it does not
exist then the PUT method should create one.

➞DELETE ⇒The DELETE method requests that the server delete the specified resource.


Thank you
i will meet you in my next blog
February 20, 2018

POSTMAN

   POSTMAN 

1.What is Postman app?
* A Little About Postman. Postman is a Google Chrome app for interacting with HTTP APIs. It presents you with a friendly GUI for constructing requests and reading responses.

2.What is Postman API?
* Postman is a powerful HTTP client for testing web services. Created by Abhinav Asthana, a programmer and designer based in Bangalore, India, Postman makes it easy to test, develop and document APIs by allowing users to quickly put 
 together both simple and complex HTTP requests.

 3.What is API in software testing?
* API TESTING is a type of software testing that involves testing application programming interfaces (APIs) directly and as part of integration testing to determine if they meet expectations for functionality, reliability, performance, and security. Since APIs lack a GUI, API testing is performed at the message layer.

4. What is REST API testing?

* Rest stands for Representational State Transfer. It is an architectural style and an approach for communication used in the development of Web Services. REST has become a logical choice for building APIs. It enables users to connect and interact with cloud services efficiently.


5.WHAT IS THE REST API?
* What is REST? REST stands for Representational State Transfer. (It is sometimes spelled "ReST".) It relies on a stateless, client-server, cacheable communications protocol -- and in virtually all cases, the HTTP protocol is used. REST is an architecture style for designing networked applications.


Postman Interface Here 

Thank you
i will meet you in my next blog
February 20, 2018

API

Restful API


1.What is the API?
  • Application program interface (API) is a set of routines, protocols, and tools for building software applications. An API specifies how software components should interact. Additionally, APIs are used when programming graphical user interface (GUI) components.


2.What is the Rest API? 
  • REST stands for Representational State Transfer. (It is sometimes spelled "ReST".) It relies on a stateless, client-server, cacheable communications protocol -- and in virtually all cases, the HTTP protocol is used. REST is an architecture style for designing networked applications.


3.What is the use of Web API?
  •    ASP.NET Web API. ASP.NET Web API is a framework that makes it easy to build HTTP services that reach a broad range of clients, including browsers and mobile devices. ASP.NET Web API is an ideal platform for building RESTful applications on the .NET Framework.
 
4.What is ReST services?
  • RESTful Web Services: A Tutorial. ... While REST stands for Representational State Transfer, which is an architectural style for networked hypermedia applications, it is primarily used to build Web services that are lightweight, maintainable, and scalable. A service based on REST is called a RESTful service.
  5. What is the rest protocol?
  • Simple Object Access Protocol (SOAP) and Representational State Transfer (REST) are two answers to the same question: how to access Web services.
  6.What is a Web service?  
  • A web service is any piece of software that makes itself available over the internet and uses a standardized XML messaging system. XML is used to encode all communications to a web service. For example, a client invokes a web service by sending an XML message, then waits for a corresponding XML response. 
  7.what a RESTFUL Api?
  •  Separate the client from the server.
  • not hold state between request.
  • use http and http methods.
                console.log(xhr.status)
                console.log(xhr.statusTest) 


 8.what the four verbs?
  • GET
  • POST
  • PUT
  • DELETE 

9.Anatomy of request ?

  • The Request  line
  • The Header
  • The Body

Getting started

For the purpose of this tutorial, I’ll work you through creating a RESTful API. To achieve this, we will create a RESTful todo list API (i.e. endpoints that will create a task, get or read list of all tasks, read a particular task, delete a task, and update a task).

Assumptions

I presume that you already have your environment set up (i.e Node.js and MongoDB is installed).

Kindly run npm -v and mongo --version as these will show you the version of NPM and MongoDB installed on your machine.

If you don’t have it installed, kindly go through this link on how to install it in order for us to create a server in Node and Mongodb.

If you do have Node and MongoDB installed, let's begin the tutorial with the following basic steps.


Open your terminal and kindly follow the following steps


  Create a Folder name todoListApi - mkdir todoListApi

  Navigate to the root of your newly created folder - cd todoListApi

  Create a package.json file - npm init
Package.json is a file that gives the necessary information to npm which allows it to identify the project as well as handle the project's dependencies.


npm init will prompt you to enter some information such as the app name, description, version, author, keyword and also ask if what you see is what you like.


You should have something like this eventually.  

enter image description here


 Kindly type yes and press enter to complete the creation of our package.json. Having done all these, your folder structure should look like this:


enter image description here 

 Create a file called server.js - touch server.js.
In this server, we will writing the protocols to create our server.


Create a folder called api - mkdir api
Inside this folder called api, create three separate folders called models, routes, and controllers by running mkdir api/controllers api/models api/routes


enter image description here 

 
 Create todoListController.js in the api/controller folder, todoListRoutes.js in the routes folder, and todoListModel in the model folder - touch api/controllers/todoListController.js api/models/todoListModel.js api/routes/todoListRoutes.js

 Our folder structure should look like this now:

enter image description here 


Server setup

Let's install express and nodmon, express will be used to create the server while nodmon will help us to keep track of changes to our application by watching changed files and automatically restart the server.

 ➞npm install --save-dev nodemon


➞npm install express --save

 On successful installation, your package.json file will be modified to have the two newly installed packages.


 Open the package.json file and add this task to the scrip 

enter image description here

 Open the server.js file and type/copy the code below into it
 var express = require('express'),  app = express(),  port = process.env.PORT || 3000;
app.listen(port);console.log('todo list RESTful API server started on: ' + port);

enter image description here


Setting up the schema

  • First of all, let’s install mongoose - npm install mongoose --save


Why Mongoose?

Mongoose is what we will use to interact with a MongoDB(Database) instance.

After installation, open the todoListModel.js file in your api/models folder and type the following code into the file and save.


'use strict';
var mongoose = require('mongoose');
var Schema = mongoose.Schema;


var TaskSchema = new Schema({
  name: {
    type: String,
    Required: 'Kindly enter the name of the task'
  },
  Created_date: {
    type: Date,
    default: Date.now
  },
  status: {
    type: [{
      type: String,
      enum: ['pending', 'ongoing', 'completed']
    }],
    default: ['pending']
  }
});

module.exports = mongoose.model('Tasks', TaskSchema);


 From the code above, we required the mongoose in our file and then, we create a model of how our collection should look like.As you can see, it the task collection(table) will contain a name: a string, and the date it was created. It also contains task status which we have defined as pending - a default value for every task created.

Setting up the routes

Routing refers to determining how an application responds to a client request for a specific endpoint, which is a URI (or path) and a specific HTTP request method (GET, POST, and so on).

Each of our routes has different route handler functions, which are executed when the route is matched.


Below we have defined two basic routes(‘/tasks’, and ‘/tasks/taskId’) with different methods
‘/tasks’ has to methods(‘GET’ and ‘POST’), while ‘/tasks/taskId’ has GET, PUT and DELETE.


As you can see, we required the controller so each of the routes methods can call it’s respective handler function.


module.exports = function(app) {
  var todoList = require('../controllers/todoListController');


  // todoList Routes
  app.route('/tasks')
    .get(todoList.list_all_tasks)
    .post(todoList.create_a_task);


  app.route('/tasks/:taskId')
    .get(todoList.read_a_task)
    .put(todoList.update_a_task)
    .delete(todoList.delete_a_task);
};

Setting up the controller
Open todoListController.js file with your text editor( Sublime, Atom e.t.c) and let’s deep dive into coding.

In this controller, we would be writing five(5) different functions namely: list_all_tasks, create_a_task, read_a_task, update_a_task, delete_a_task. We will exported each of the functions for us to use in our routes.

Each of these functions uses different mongoose methods such as find, findById, findOneAndUpdate, save and remove.

    
             res.send(err);
    res.json(task);
  });
};

exports.delete_a_task = function(req, res) {

  Task.remove({
    _id: req.params.taskId
  }, function(err, task) {
    if (err)
      res.send(err);
    res.json({ message: 'Task successfully deleted' });
  });
}; 

Putting everything together
 Connect our database by adding a url to the mongoose instance connection

  Load the created model - task

Install bodyParser and use
bodyParser Parse incoming request bodies in a middleware before your handlers, available under the req.body property.
It exposes various factories to create middlewares. All middlewares will populate the req.bodyproperty with the parsed body, or an empty object ({}) if there was no body to parse (or an error was returned).

Register our created routes in the server


var express = require('express'),
  app = express(),
  port = process.env.PORT || 3000,
  mongoose = require('mongoose'),
  Task = require('./api/models/todoListModel'),
  bodyParser = require('body-parser');
  
mongoose.Promise = global.Promise;
mongoose.connect('mongodb://localhost/Tododb'); 

app.use(bodyParser.urlencoded({ extended: true }));
app.use(bodyParser.json());

var routes = require('./api/routes/todoListRoutes');
routes(app);

app.listen(port);

console.log('todo list RESTful API server started on: ' + port); 
Start MongoDB Server
  
Open your terminal and run mongod
 This will start your MongoDB server and then, node server could connect to the MongoDB instance. Once your MongoDB server is running, restart your node server by running: rs on your nodemon running terminal. 

⟹Testing via Postman

Now that everything is now connected, let’s test each of the routes and the respective methods.
Open your postman and type:

 http://localhost:3000/tasks in the enter request URL section and press enter.

 Screen Shot 2017-03-03 at 8.15.35 PM.png
 On enter, you should see “[]” because there is nothing in the database yet.


On the same address, change the method to POST, click body and select “x-www-form-urlencoded”.
Then, enter name as the key and the corresponding task name as value.
After this, click on send button.
This should give you a response 200 ok

Screen Shot 2017-03-03 at 8.12.55 PM.png 


Adding a middleware

Having done all these, what happens if we entered a wrong route? say you entered 'http://localhost:3000/task', It responds with a message “Cannot GET /task”. Let’s add express middleware which could be used to return more interactive messages.

Middlewares basically intercepts incoming http request and as such you can use them to perform several operations ranging from authentication to validations etc.
 app.use(function(req, res) {
  res.status(404).send({url: req.originalUrl + ' not found'})});

   
                                    i will meet you next post continue....